How to Make Your Own Jigsaw Puzzle: A Step-by-Step Guide
Jigsaw puzzles have been a beloved pastime for generations, offering hours of entertainment and mental stimulation. But have you ever thought about creating your own jigsaw puzzle? Whether you want to personalize a gift, create a unique piece of art, or simply enjoy the process of making something from scratch, crafting your own jigsaw puzzle can be a rewarding experience. In this comprehensive guide, we’ll walk you through the steps on how to make your own jigsaw puzzle, from selecting the right materials to cutting the pieces and assembling your masterpiece.
0Why Make Your Own Jigsaw Puzzle?
Before diving into the process, let’s explore why you might want to create your own jigsaw puzzle:
-
Personalization: A custom puzzle allows you to use a photo, artwork, or design that holds special meaning to you or the recipient.
-
Creativity: Designing your own puzzle gives you complete control over the image, size, and complexity.
-
Eco-Friendly: By using recycled materials or sustainable practices, you can create an environmentally friendly puzzle.
-
Unique Gifts: Handmade puzzles make thoughtful and one-of-a-kind gifts for birthdays, holidays, or special occasions.
-
Fun Project: The process of making a puzzle can be just as enjoyable as solving it!
Materials You’ll Need
To get started, gather the following materials:
-
Image or Design: Choose a high-resolution photo, artwork, or printed design.
-
Puzzle Base: Use sturdy cardboard, foam board, or wood as the base for your puzzle.
-
Adhesive: Mod Podge, spray adhesive, or glue sticks to attach the image to the base.
-
Cutting Tools: A jigsaw, scroll saw, or laser cutter for wood puzzles; a utility knife or craft cutter for cardboard puzzles.
-
Ruler and Pencil: For measuring and marking cutting lines.
-
Protective Coating: Clear sealant or varnish to protect the image.
-
Sandpaper: To smooth rough edges (if using wood).
-


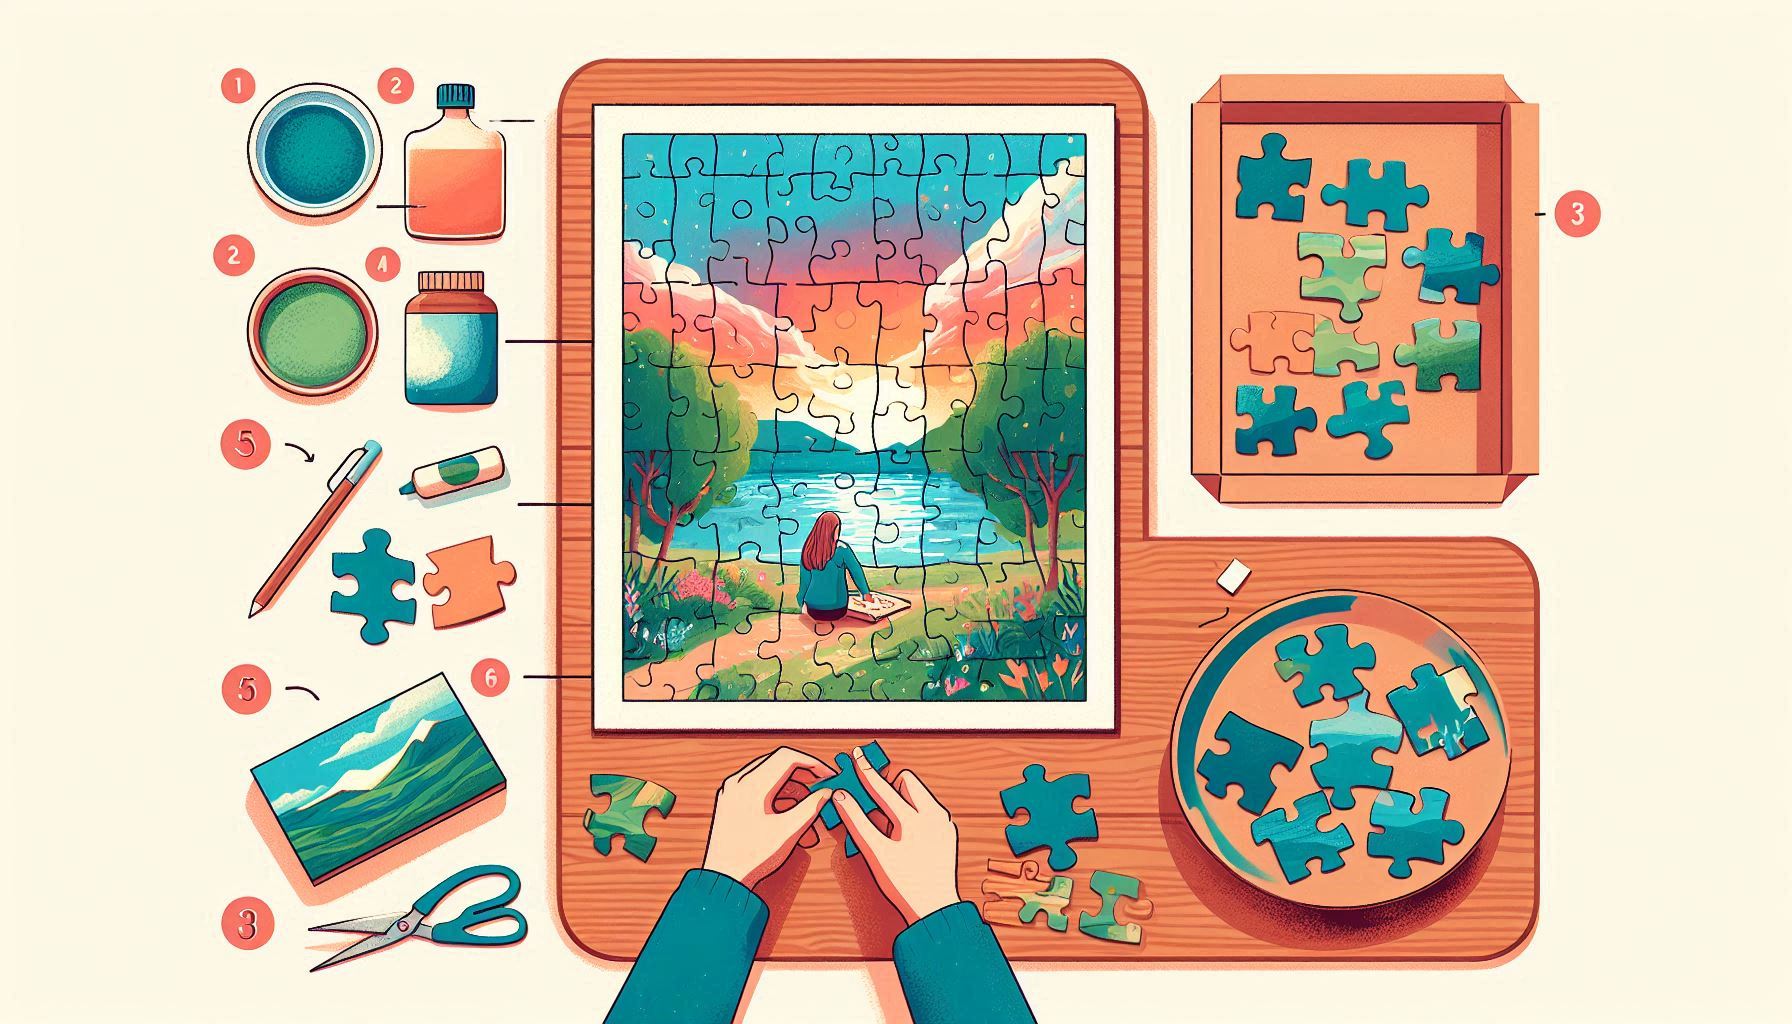
Step-by-Step Guide to Making Your Own Jigsaw Puzzle
Step 1: Choose Your Image
The first step in creating your puzzle is selecting the image or design you want to use. This could be a family photo, a piece of artwork, or even a collage. Ensure the image is high-resolution to avoid pixelation when printed. If you’re using a digital image, print it at the desired size using a high-quality printer.
Pro Tip: For a more challenging puzzle, choose an image with intricate details or patterns. For beginners, opt for simpler designs with clear distinctions between colors and shapes.
Step 2: Prepare the Puzzle Base
Once you have your image, it’s time to prepare the base. The material you choose will depend on the type of puzzle you want to create:
-
Cardboard: Ideal for lightweight, easy-to-cut puzzles. Use thick, durable cardboard for longevity.
-
Foam Board: A great middle ground between cardboard and wood, offering sturdiness without being too heavy.
-
Wood: Perfect for high-quality, durable puzzles. Plywood or MDF (medium-density fiberboard) works well.
Cut the base to match the size of your printed image. Use a ruler and pencil to mark the dimensions, then carefully cut the material using a utility knife, saw, or laser cutter.
Step 3: Attach the Image to the Base
Next, adhere your image to the puzzle base. Apply a thin, even layer of adhesive to the base, then carefully place the image on top. Smooth out any air bubbles or wrinkles using a credit card or squeegee. Allow the adhesive to dry completely before moving on to the next step.
Pro Tip: For added durability, apply a protective coating of Mod Podge or clear sealant over the image once it’s dry. This will help prevent the image from peeling or fading over time.
Step 4: Create a Puzzle Template (Optional)
If you’re new to puzzle-making, using a template can help ensure your pieces are uniform and fit together properly. You can find printable puzzle templates online or create your own by drawing interlocking shapes on a piece of paper. Place the template over your puzzle base and trace the shapes lightly with a pencil.
Step 5: Cut the Puzzle Pieces
Now comes the fun part—cutting the puzzle pieces! The method you use will depend on the material of your puzzle base:
-
Cardboard or Foam Board: Use a utility knife or craft cutter to carefully cut along the traced lines. Take your time to ensure clean, precise cuts.
-
Wood: Use a jigsaw, scroll saw, or laser cutter to cut the pieces. Sand any rough edges for a smooth finish.
Pro Tip: Start by cutting the border pieces first, then work your way inward. This will help you maintain the overall shape of the puzzle.
Step 6: Test and Refine
Once all the pieces are cut, test the puzzle by assembling it. This will help you identify any pieces that don’t fit properly or need adjustments. If necessary, use sandpaper or a craft knife to refine the edges.
Step 7: Add Finishing Touches
To give your puzzle a professional finish, consider adding a few final touches:
-
Label the Pieces: Number the back of each piece to make reassembly easier (optional).
-
Store in a Box: Create or repurpose a box to store your puzzle. You can even design a custom label for the box.
-


Tips for Success
-
Start Small: If you’re new to puzzle-making, begin with a smaller puzzle (e.g., 50-100 pieces) to build your skills.
-
Use Quality Materials: High-quality materials will result in a more durable and professional-looking puzzle.
-
Be Patient: Cutting puzzle pieces can be time-consuming, so take your time to ensure accuracy.
-
Experiment with Shapes: Don’t be afraid to get creative with the shapes of your puzzle pieces. Unique shapes can add an extra layer of challenge and fun.
Alternative Methods for Making Jigsaw Puzzles
If you don’t have the tools or time to make a puzzle from scratch, there are alternative methods to create custom puzzles:
-
Online Puzzle Services: Many companies offer custom puzzle printing services. Simply upload your image, choose the size and number of pieces, and they’ll create a professional-quality puzzle for you.
-
Puzzle Kits: Purchase a blank puzzle kit, which includes pre-cut pieces and a blank surface for you to decorate.
-
DIY Software: Use puzzle-making software to design and print your puzzle on adhesive paper, which can then be applied to a puzzle base.
Conclusion
Learning how to make your own jigsaw puzzle is a fun and creative project that allows you to express your personality and craftsmanship. Whether you’re making a puzzle for yourself or as a gift, the process is both rewarding and enjoyable. By following the steps outlined in this guide, you’ll be able to create a custom puzzle that’s as unique as you are. So gather your materials, unleash your creativity, and start building your very own jigsaw puzzle today!
SEO Keywords: how to make your own jigsaw puzzle, DIY jigsaw puzzle, custom jigsaw puzzle, homemade jigsaw puzzle, create your own puzzle, personalized jigsaw puzzle, jigsaw puzzle ideas, DIY puzzle project, how to make a puzzle, custom photo puzzle.
By incorporating these keywords naturally throughout the article, you’ll improve its search engine visibility and attract readers interested in creating their own jigsaw puzzles. Happy puzzling!

How to Build a Scalable Video Streaming App: A Step-by-Step Guide

Best IPTV and IPTV Top Services: Your 2025 Entertainment Guide
Mistakes to Avoid When Choosing the Best Indoor Play for Birthday Parties

Pikashow Latest Version Download: Everything You Should Know

Roar into Adventure: The Best Dinosaur Video Games to Play in 2023

Top Gardenscapes-Style Games to Play in 2023: Best Alternatives for Puzzle and Design Lovers
